Chapter 1: Creating your work skin to add new fonts
Chapter Text
Okay, fellow writers, ready to start? I admit that it took me ages to figure out this matter, because, well, I'm not the most digitally inclined lady out there, but I figured it out at last and now, I'm gonna share my discoveries with you all!
First of all, you need to create a work skin, so you have to do the following passages:
Log-in and then click on the "Skins" link on the left side of the dashboard.
Once there, click on "My Work skins" and this will lead you to a page with the same title.
Now click on the "Create work skin" button on the upper right side of the page.
Give a title to your work skin, for example "diversi fonts".
Make sure to give your work skin an original name, because if there is an already existing one with the same name, the site won't accept it. To avoid this problem, you could give the work skin the same name of the work you're going to use it for.
Now, in the CSS part, you just need to copy and paste the following stuff...I know it's a lot, but trust me, it's worth it:
#workskin .Arial {
font-family: Arial, sans-serif;
}
#workskin .Verdana {
font-family: Verdana, sans-serif;
}
#workskin .Helvetica {
font-family: Helvetica, sans-serif;
}
#workskin .Tahoma {
font-family: Tahoma, sans-serif;
}
#workskin .TrebuchetMS {
font-family: 'Trebuchet MS', sans-serif;
}
#workskin .TimesNewRoman {
font-family: 'Times New Roman', serif;
}
#workskin .Georgia {
font-family: Georgia, serif;
}
#workskin .Garamond {
font-family: Garamond, serif;
}
#workskin .CourierNew {
font-family: 'Courier New', monospace;
}
#workskin .BrushScriptMT {
font-family: 'Brush Script MT', cursive;
}
#workskin .Handwriting {
font-family: Edwardian Script ITC, cursive;
}
#workskin .Corsivo {
font-family: Kunstler Script, cursive;
}
#workskin .Newcursive {
font-family: Palace Script MT, cursive;
}
#workskin .Papyrus {
font-family: Papyrus, fantasy;
}
#workskin .Comic {
font-family: Comic Sans MS, cursive;
}
#workskin .Copperplate {
font-family: 'Copperplate Gothic', serif;
}
#workskin .Lucida {
font-family: Lucida Handwriting, cursive;
}
#workskin .Cally {
font-family: Lucida Calligraphy, cursive;
}
Now you have all the above fonts available in your work skin.
A little piece of advice: before choosing which font you will use, please take a look at the following chapter to see the effect of that specific font on the device you're using. I'm telling you this because on some mobile devices, there are some fonts that appear as the standard serif, sans-serif or cursive font, even if on a computer they appear with their intended looks.
IMPORTANT! Please remember, for all the codes you will use in the future, that in the line "font-family" of the new code, you need to write the exact same thing that is written in the "font-family" line highlighted in yellow in the original font code, NOT the name given to the font. To make an example, let's take the code I called Cally in this tutorial: Cally is the name I gave to that font, but the font-family is actually Lucida Calligraphy, so you need to write Lucida Calligraphy in the code, not Cally. Basically, you just need to copy the entire "font-family" line highlighted in yellow from the original code and paste it into the code you want to create.
Of course, to use all these fonts, you need to enable the work skin in your story, so it's time for the next step: open the first chapter of your story/work where you want to use new fonts, then click on the "Edit" button at the top of the page.
Now scroll down. In the section named "Associations" you'll see a section named "Select work skin". Click on it and you'll see a list of available work skins, including your custom one. Select the custom work skin you want to use and click "Post".
Just a little warning: Basic Formatting is actually the default work skin for Ao3, the one that only allows the standard black text and standard font. It's automatically added to the list of work skins available by the site, but it's not one of the custom work skins, it's just the way they give to the users to sort of change the work back to the default settings.
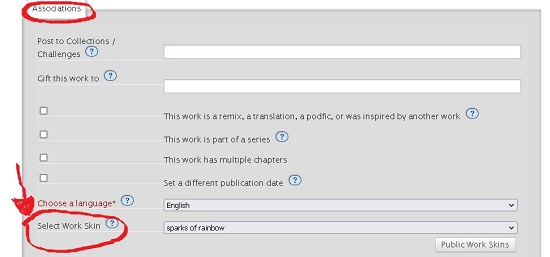
This passage is fundamental, because it will enable you to use the work skin on the whole work.
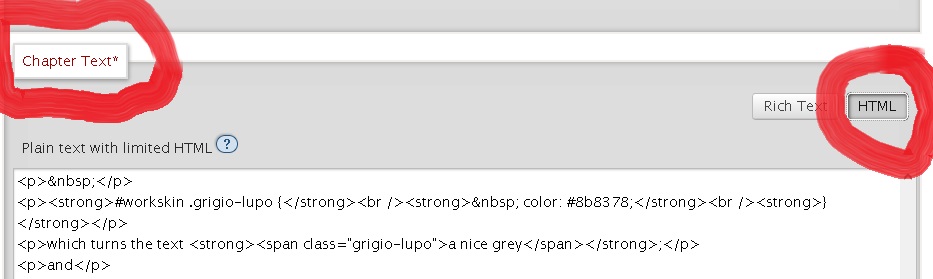
Now that the work skin is enabled, select "Edit" if the work has only one chapter, or “Edit chapter” for the chapter you want to apply the code to and in the section named "Chapter Text" (or "Work Text" is the work has only one chapter), select the HTML option instead of the “Rich text” option.
You can make the fonts in different colors by modifying the font code in the work skin like this (I'm using the font "Brush Script MT" as an example):
#workskin .Brushgreen {
font-family: 'Brush Script MT', cursive;
color: #22ca84;
}
In short, you add the part color: #22ca84; to the code, only putting in the HTML color code of your choice instead of #22ca84 if you want a different color.
You can find lists of HTML color codes here, here, here and here.
Here you can find another list of HTML colors, which also includes fluorescent colors and (just use the HTML code and don't mind the names, because they are the names of the crayons and don't work in the CSS).
This site contains nine pages of html color tables, with each table containing several shades of a certain color (for example, shades of indigo, shades of aquamarine, shades of burgundy and so on), which is very useful if you want to create a gradient in shades of the same color.
You can also use this very helpful color picker, which will give you the HEX color code and also show you many other shades of the chosen color, each with the matching HEX code.
A small suggestion: I found that using the HEX color codes instead of the rgb codes is safer, as it's less likely to cause trouble when you use them in a workskin. If you find a rgb color you like, or if the code given by the gradient generator contains rgb codes instead of HEX codes, you can use this rgb to HEX converter to get the matching HEX code for each rgb code.
To make some words in the new font of your choice, in the HTML you need to add <span class="Brushgreen"> before the words and </span> after the words. I wrote "Brushgreen" here because that's the name I'm using for the example, but you will use the name you gave to the font of your choice.
So when you write your story, in HTML it looks like this:
Her eyes lit up as she saw the adorable dog, <span class="Brushgreen">"SO CUTE!"</span>, she squealed.
And once posted it looks like this:
Her eyes lit up as she saw the adorable dog, "SO CUTE!", she squealed.
You can also change the size of the font by adding the line font-size to the code in the work skin, like this:
#workskin .Brushgold {
font-family: 'Brush Script MT', cursive;
font-size: 48px;
color: #c97b1e;
}
So when you write your story, in HTML it looks like this:
The <span class="Brushgold">eagle</span> flew high into the sky.
And once posted it looks like this:
The eagle flew high into the sky.
Of course, here I wrote 48px because that's the size I gave to the font of my choice, but you will write the size you want in the code.
To add a gradient effect to your fancy font, there are two ways.
The first way is to use the h? code, writing the code like this for a radial gradient effect (in this example it's from the corners to the centre):
#workskin h4 {
font-family: Edwardian Script ITC, cursive;
font-size: 36px;
background: radial-gradient(circle farthest-corner at center center, #FF0000 0%, #FFFF00 25%, #05C1FF 50%, #FFFF00 75%, #FF0000 100%);
-webkit-background-clip: text;
-webkit-text-fill-color: transparent;
}
and writing the code like this for a linear gradient effect (in the example it's from left to right):
#workskin h3 {
font-family: Edwardian Script ITC, cursive;
font-size: 36px;
background: linear-gradient(to right, #f8295a 0%, #05C1FF 25%, #9c1cea 50%, #05C1FF 75%, #f8295a 100%);
-webkit-background-clip: text;
-webkit-text-fill-color: transparent;
}
The percentage you see indicates the point where each color starts, in this case #8F0FFF starts at 0%, meaning at the beginning of the chosen text (or at the outer corner for the radial effect used here), then we have #05C1FF that starts at 25%, #00FF00 at 50%, then we have again #05C1FF at 75% and finally #8F0FFF going to the end (or the centre for the radial effect used here) of the chosen text.
You can modify the gradient effect code by changing the number of colors in it (remember to change also the percentage in that case), or changing the colors according to your personal taste.
One important thing to remember is that, if you use the h? code, you can only use ONE gradient effect per work skin, so you need to choose which effect you want to add to your work, either the linear gradient or the radial gradient, but not both. On the other hand, you can put more than one gradient effect of the same type in the same work skin, for example two different linear gradients, one in tones of red-orange-yellow and one in tones of green-blue-purple.
Another important thing to remember for the headline code, be it linear or radial, is that you MUST give the code the name h?, where the ? stands for a single digit number up to and including 6. Any number over 6 won't work.
To use the gradient effect with the headline code, you need to put <h?> before the chosen part of text you want to give the effect to and </h?> after it (for the example I'm going to use the code I called h4 here).
So in HTML it looks like this:
<h4>The vines as one pressed on the eight tiles with the spider and pushed them into the wall. A second later, a section of the wall slid sideways to reveal huge bronze double doors, covered in extremely detailed carvings which depicted spider-demons devouring all kind of creatures, from fly-kin to even dog-kin. In the centre of it all was a spider-kin lounging on a throne and its name was engraved on the base of the seat.</h4>
And once posted it looks like this:
The vines as one pressed on the eight tiles with the spider and pushed them into the wall. A second later, a section of the wall slid sideways to reveal huge bronze double doors, covered in extremely detailed carvings which depicted spider-demons devouring all kind of creatures, from fly-kin to even dog-kin. In the centre of it all was a spider-kin lounging on a throne and its name was engraved on the base of the seat.
The other way to have your text in gradient color is to use the regular code, like this:
#workskin .colorful {
font-family: Edwardian Script ITC, cursive;
font-size: 36px;
background: radial-gradient(circle farthest-corner at center center, #FF0000 0%, #FFFF00 25%, #05C1FF 50%, #FFFF00 75%, #FF0000 100%);
-webkit-background-clip: text;
-webkit-text-fill-color: transparent;
}
So in HTML you write it like this:
<span class="colorful">The vines as one pressed on the eight tiles with the spider and pushed them into the wall. A second later, a section of the wall slid sideways to reveal huge bronze double doors, covered in extremely detailed carvings which depicted spider-demons devouring all kind of creatures, from fly-kin to even dog-kin. In the centre of it all was a spider-kin lounging on a throne and its name was engraved on the base of the seat.</span>
And once posted, it looks like this:
The vines as one pressed on the eight tiles with the spider and pushed them into the wall. A second later, a section of the wall slid sideways to reveal huge bronze double doors, covered in extremely detailed carvings which depicted spider-demons devouring all kind of creatures, from fly-kin to even dog-kin. In the centre of it all was a spider-kin lounging on a throne and its name was engraved on the base of the seat.
As you can see, using the headline code h? the gradient effect is spread to the entire block of text as if it was a single line, while using the regular code, the gradient effect follows the line from the first word to the last word, giving a different visual effect. Both are visually pleasant, so it's up to you to decide which code to use. But the regular code has an advantage, that is, you can use both linear gradient and radial gradient in the same workskin without problems, while you can't have two h? codes with different gradient effects in the same workskin or they will get in conflict.
Also, using the h? code will make other parts of the work in gradient effect, depending on the number of the code. To be more specific, h2 changes the color and font of the story title, while h3 changes the color and font of the author name, of the summary title and of the notes title.
If you want the whole chapter, or even just several paragraphs in a row, to be in your chosen font, in HTML you need to write <div class="xxx"> before the start of the chapter or block of paragraphs and </div> after the end of the chapter or block of paragraphs. But make sure to put the <div class="xxx"> before the <p> at the beginning of the chapter and the </div> after the </p> at the end of the chapter.
So in HTML it's written like this:
<div class="Cally"><p>This is the first line.</p>
<p>This is the second line.</p>
<p>This is the third line.</p></div>
And once posted, it looks like this:
This is the first line.
This is the second line.
This is the third line.
Enjoy the freedom of adding new fonts and colors to your works, fellow writers! ^-^
If you want to also add regular colored text to your works, you can check out my guide for colored text here.
Next chapter shows the appearance of every font type I listed in this guide.
You can find more custom fonts around the web, but remember that most of them (for example Autumn Flowers, Bradley Hand ITC and Bronzion Deco) need to be installed both on your computer and on the readers' computer/tablet/phone/whatever they are reading your work on, otherwise your readers won't see the fancy effect that you see, they will only see the regular font instead.
PS: As of today, 30 June 2024, I posted a guide to add highlighted text(also with gradient effect), redacted text like this hello and text boxes to your works, you can find it here.
As of today, 28 July 2024, I posted a guide for text with glitch effect similar to the Zalgo font, mirror text, upside down text and vertical text, you can find it here.
As of today, 5 August 2024, I posted a guide to add underline and line dividers, also in gradient colors and with emoticons and emoji, you can find it here.
As of today, 9 August 2024, I posted the guide to add shadowed text, text with a border, 3D text and NEON TEXT, you can find it here.
As of today, 13 November 2024, I posted a guide to change the background color and text style of your story and to give every chapter a different background color and text style, you can find it here.
Finally, I posted a small collection of twenty gradients, each with a ready to copy-paste code, you can find it here.
And if you want to learn more amazing tricks with CSS for changing the style of the title, username and much more, check out heark/hearker's awesome guide here!
Chapter 2: What the fonts look like
Summary:
This chapter shows you what the fonts I put in the first chapter look like once posted.
I changed their size and color according to my tastes, but you of course can modify them to your heart's content by following the instructions in first chapter ^-^
Chapter Text
ARIAL
This is the Arial font in size 28px
VERDANA:
This is the Verdana font in size 28 px
HELVETICA:
This is the Helvetica font in size 28 px
TAHOMA:
This is the Tahoma font in size 28px
TREBUCHETMS:
This is the TrebuchetMS font in size 28px
TIMESNEWROMAN:
This is the TimesNewRoman font in size 28px
GEORGIA:
This is the Georgia font in size 28px
GARAMOND:
This is the Garamond font in size 28px
COURIERNEW:
This is the CourierNew font in size 28px
BRUSHSCRIPTMT:
This is the BrushScript MT font in size 28px
HANDWRITING (actual font family name: Edwardian Script ITC):
This is the Edwardian Script ITC font in size 32px and color #ffa500
CORSIVO (actual font family name: Kunstler Script):
This is the Kunstler Script font in size 48px and color #f8295a
NEWCURSIVE (actual font family name: Palace Script MT):
This is the Palace Script MT font in size 48px and color #4169e1
PAPYRUS:
This is the Papyrus font in size 28px
COMIC (actual font family name: Comic Sans MS)
This is the Comic Sans MS font
COPPERPLATE
This is the Copperplate font
LUCIDA (actual font family name: Lucida Handwriting)
This is the Lucida Handwriting font
CALLY (actual font family name: Lucida Calligraphy)
This is the Lucida Calligraphy font
k1t3clisp3 on Chapter 1 Sun 21 Sep 2025 05:01PM UTC
Comment Actions
Goddess_of_the_arena on Chapter 1 Mon 22 Sep 2025 09:38AM UTC
Comment Actions
fakestRen on Chapter 1 Wed 29 Oct 2025 09:41PM UTC
Comment Actions
Goddess_of_the_arena on Chapter 1 Thu 30 Oct 2025 09:36AM UTC
Comment Actions
FelesRubrum on Chapter 1 Fri 12 Dec 2025 04:41PM UTC
Comment Actions
Goddess_of_the_arena on Chapter 1 Sat 13 Dec 2025 10:20AM UTC
Comment Actions
PitchBitch on Chapter 1 Sun 14 Dec 2025 07:41PM UTC
Comment Actions
Goddess_of_the_arena on Chapter 1 Mon 15 Dec 2025 10:06AM UTC
Comment Actions
LifeNreality on Chapter 2 Thu 06 Jun 2024 09:52PM UTC
Comment Actions
LifeNreality on Chapter 2 Thu 06 Jun 2024 10:06PM UTC
Comment Actions
Goddess_of_the_arena on Chapter 2 Fri 07 Jun 2024 09:32AM UTC
Comment Actions
LifeNreality on Chapter 2 Fri 07 Jun 2024 10:20PM UTC
Comment Actions
Goddess_of_the_arena on Chapter 2 Sat 08 Jun 2024 08:46AM UTC
Last Edited Sat 08 Jun 2024 09:17AM UTC
Comment Actions
hist0ry_huh on Chapter 2 Sat 25 Jan 2025 06:17PM UTC
Comment Actions
Goddess_of_the_arena on Chapter 2 Sun 26 Jan 2025 12:28PM UTC
Comment Actions
Animehaircolors on Chapter 2 Thu 14 Aug 2025 01:24AM UTC
Comment Actions
Goddess_of_the_arena on Chapter 2 Thu 14 Aug 2025 09:08AM UTC
Comment Actions
BabsVibes on Chapter 2 Tue 09 Sep 2025 09:50PM UTC
Comment Actions
Goddess_of_the_arena on Chapter 2 Wed 10 Sep 2025 10:44AM UTC
Comment Actions